Tutorials - Gemini AI Photoshop Plugin
With this Photoshop Plugin, you can easily integrate Google’s Nano Banana generative AI directly into Photoshop. Key benefits include full cost control: use your own API key and pay only for what you use. No subscription is required, which gives you flexibility and transparency.
When Adobe added support for Google’s Nano Banana Pro in late 2025, I expected it would greatly help with photo retouching. However, I quickly realized that a separate subscription was required. For about 10 euros, you get 2,000 credits per month, which covers 40 uses of Google’s generative AI.
The subscription model might suit you if you want access to models beyond Google's, but you usually pay more for Nano Banana than you would if you used the API directly. Using your own API key is especially cost-effective when usage varies, helping you avoid unused credits each month and providing predictable, transparent spending.
This method also provides clear cost visibility and helps you maximize your budget. To estimate direct API costs, check Google’s official pricing.
Another advantage I must mention is the ability to retouch selections up to 4096x4096px, which is more than the current Nano Banana integration in Photoshop allows. To allow these resolutions, I included Google’s latest Nano Banana 2 and Nano Banana Pro models.
For 9,50 Euro, you receive a ZIP file with detailed installation and usage instructions, as well as the plugin.
Once installed, you must first provide a Google Gemini API key. Then, the plugin lets you prompt Google’s AI to retouch your photos. As a first step, you must make a selection. For highest possible quality, I recommend using a square selection. Google natively supports square images, and by providing data with a 1x1 aspect ratio, unnecessary distortions during image rescaling can be avoided.
The plugin also supports rectangular selections in different aspect ratios. For non-square selections, the plugin will automatically rescale the image to fit the closest supported aspect ratio within a 1x2 to 2x1 range. But, as I show in the video below, this will result in a small quality loss.
To keep the quality high, the plugin uses PNG with lossless compression when transmitting images to Nano Banana. The native tooling from Adobe, which is typically used in plugins, only supports JPEG because it’s intended primarily for previews in the plugin panel. Some tricks had to be used to get PNG encoding and decoding with high-quality rescaling to work. In the video, you can see there’s nearly no loss in quality when retouching images with Nano Banana using my plugin with square selections. Mind, though, that whenever you use Generative AI, your image data is transmitted and received in 8-bit. This is a limitation of Nano Banana.
If you buy my plugin, you’ll get all future updates for free. This will include any additional features I might add. But full transparency: I’ve not planned any new features yet. I first want people to use the basic retouching functionality for a while, then hopefully gather some feedback on what’s missing.
I’ll add new Gemini Models after they release and I’ve tested them. Currently, I support Nano Banana v1, Pro, and v2.
If you have selections up to 1k, I recommend using Nano Banana v1 as it’s much faster than the other two.
In the video above, I show you how to use the plugin. I’ve kept the interface clean to make the plugin simple to use. As a first step, you must provide a Gemini API key. The accompanying documentation contains a section on how to create one.
Once an API key is added to the plugin, five retouching instances will become available. You can let those work on different areas of your photo in parallel. I’ve added this parallel editing because the Gemini API can sometimes take several minutes to provide a result when using Nano Banana v2 and Pro.
The plugin will provide information about the elapsed time of a retouching job and its current status. If a job fails, this is often due to limitations in Google’s Gemini API. Nano Banana v2 and Pro may experience outages during high-demand periods. If that happens, you can always fall back to v1 and work on smaller retouching jobs.
Once a retouching job is finished, a new layer is created containing the generated pixels. Those typically blend very well with the rest of the photo. For the best results, I recommend adding a black mask to this new layer, then using a white brush to reveal only the areas you want to retouch. I show this process in the video.
Prompting Nano Banana for retouching is easy. The prompts don’t have to be complicated. Most of the time, you’ll want to remove or improve something.
For this, you often need only a single sentence or command. For more complex scenes you want to retouch, you might lead with a brief introduction that sets the scene's context. This is sometimes necessary if the selection lacks sufficient context for the AI. That is, even a 4k selection may not tell the AI enough about what the image it is retouching is about.
Since API calls are relatively cheap, you can always repeat them, making slight adjustments to your prompt. Start simple, assess the result, and then refine your prompt to avoid any flaws you recognize. As an example, you might select a city lantern and prompt the AI to “turn off the light”. This might work, but the AI could also change the overall lighting within the selection. If that happens, extend your prompt to be more specific about what you want, and try again.
If your prompts become more complex, you might also want to switch to Nano Banana Pro, which supports better reasoning capabilities. But unless you generate images from a blank piece of canvas, this is usually not required.
And don’t forget that AI is just another tool in your toolbox. Combine it with other retouching tools and apply masks to the AI results to be selective about how you apply it. You will achieve the best results if you continue using the healing brush and clone stamp for simpler retouching, and AI for very detailed scenes that are difficult to reconstruct after removing an element.
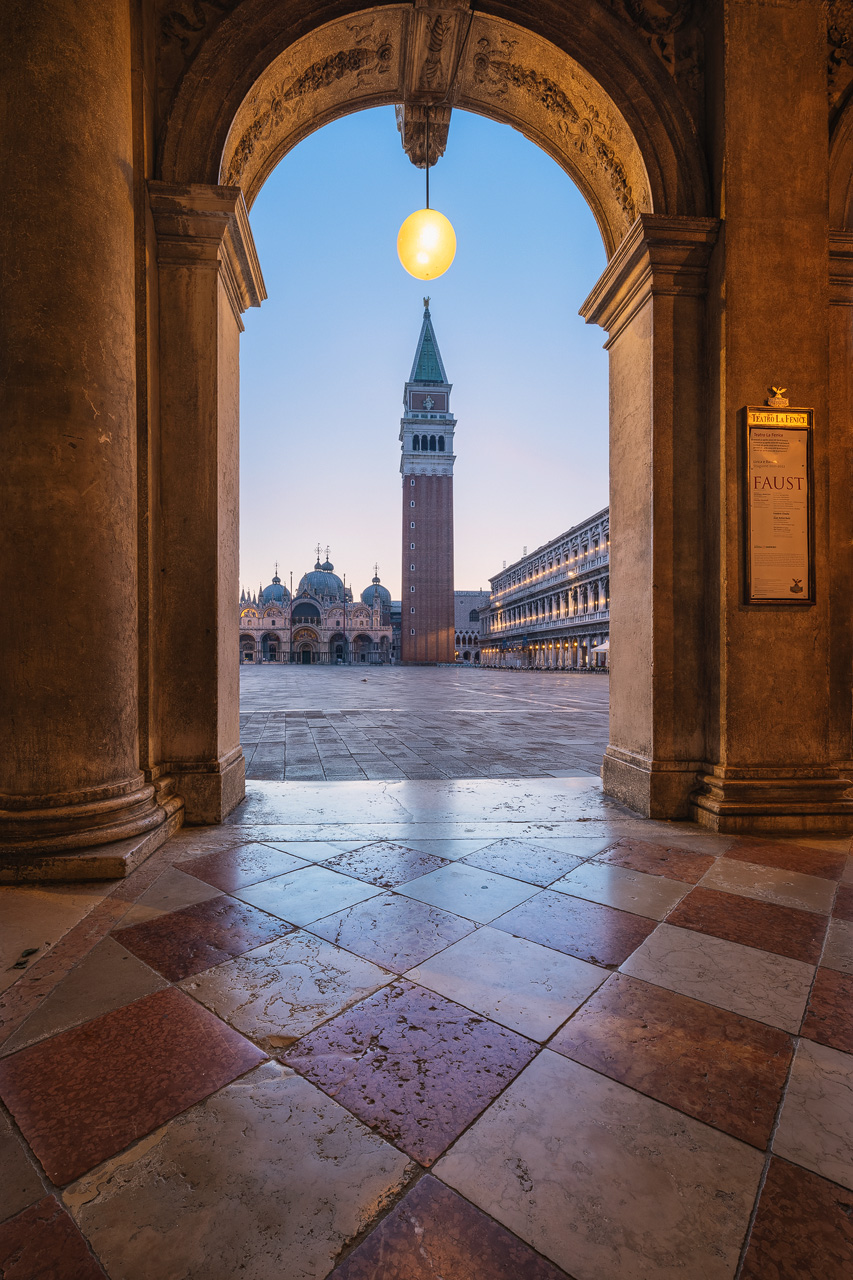
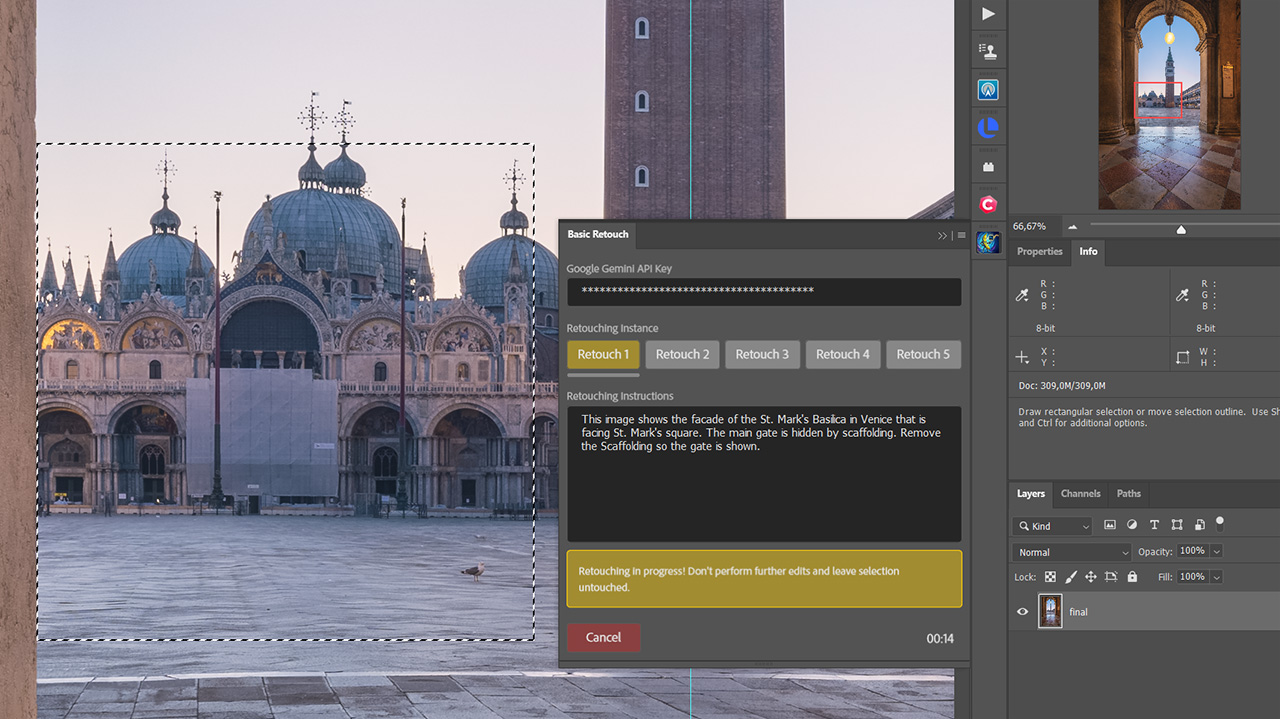
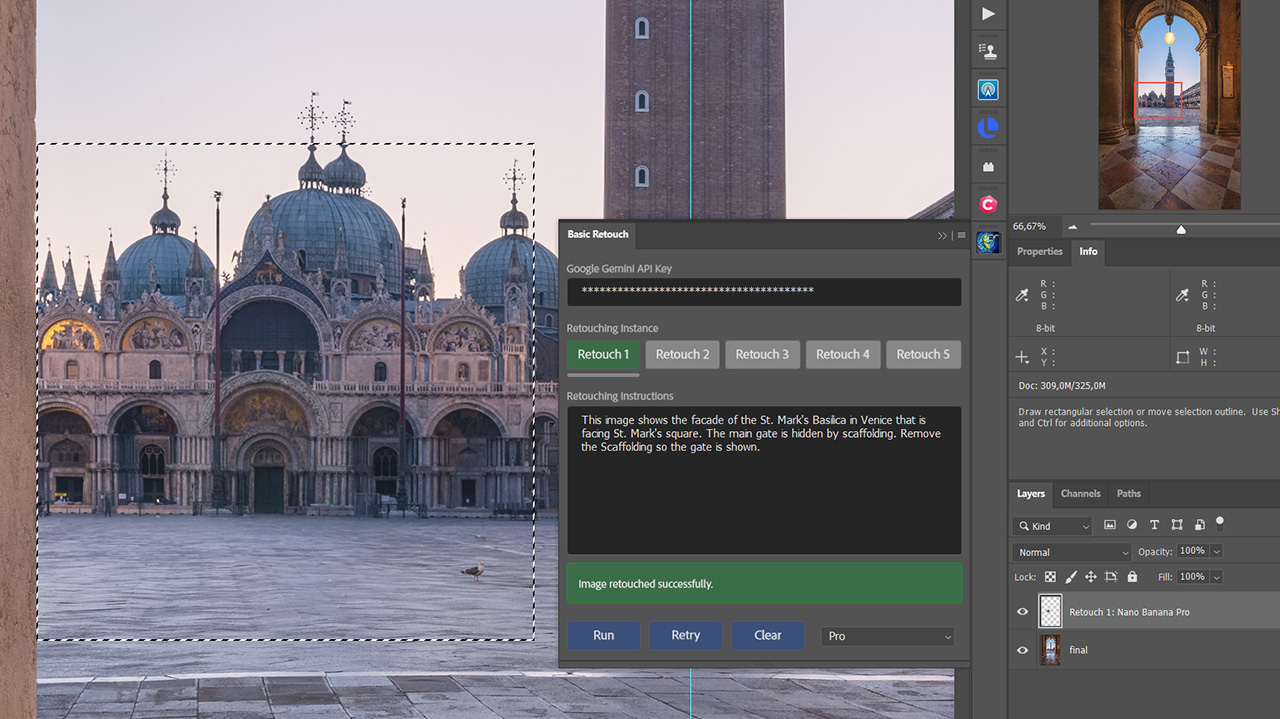
One feature I want to point out is the reconstruction of popular views and scenes. I had a photo of St. Mark’s Basilica in Venice with the main gate completely shrouded in scaffolding. It would have been impossible for me to retouch this manually. But both Nano Banana Pro and Nano Banana v2 were able to reconstruct the original gate with all its details. For this to work, I provided a detailed description of what was in my selection, telling the AI that this was the facade of the St. Mark’s Basilica in Venice, with the main entrance gate hidden by scaffolding. I then told it to remove the scaffolding. You see the result in the before and after.
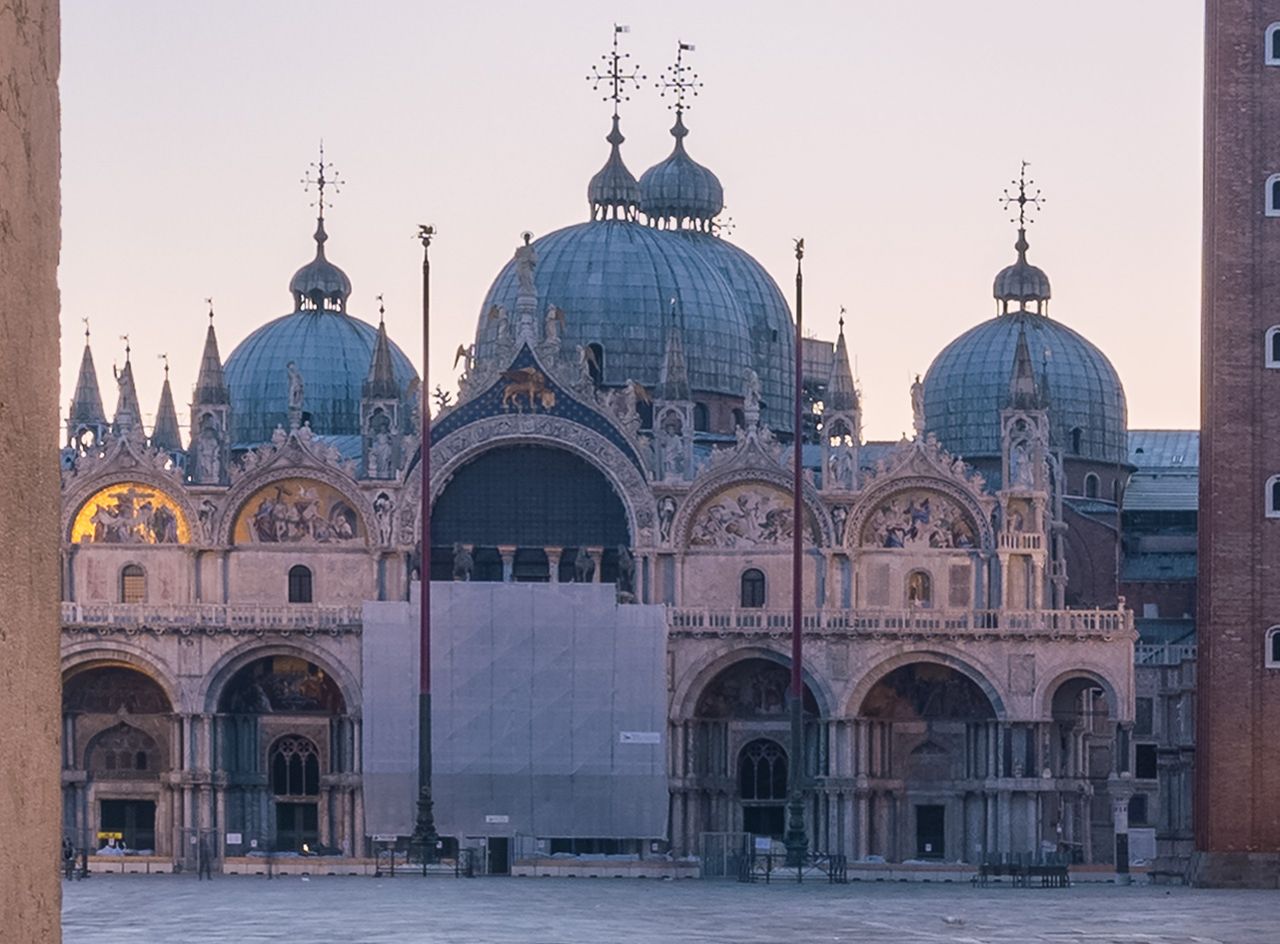

This worked better than I could have imagined. But I also want to caution you, as this is a massive change to a photo. It works well for famous buildings when the area you are retouching is a small part of your image. If the area makes up a large part of your photo, you might not get the quality you are looking for. And you should also consider that changing a large portion of your photo with AI is more than a simple cleanup. Draw your line for AI usage where you feel comfortable.
You need Photoshop 2024 or later, a Google account for the Gemini API, and a credit card for Google Cloud Billing. The video shows the setup process.
Once a month, I'll send a roundup of new tutorials, articles, and other news about photography. If that's interesting for you, make sure to subscribe to my newsletter.