Tutorials - Photo Editing for star trail Photos

19.00 EUR
In-depth photo editing tutorial for star trail Photos, with advanced blending techniques.
19.00 EUR
In-depth photo editing tutorial for star trail Photos, with advanced blending techniques.
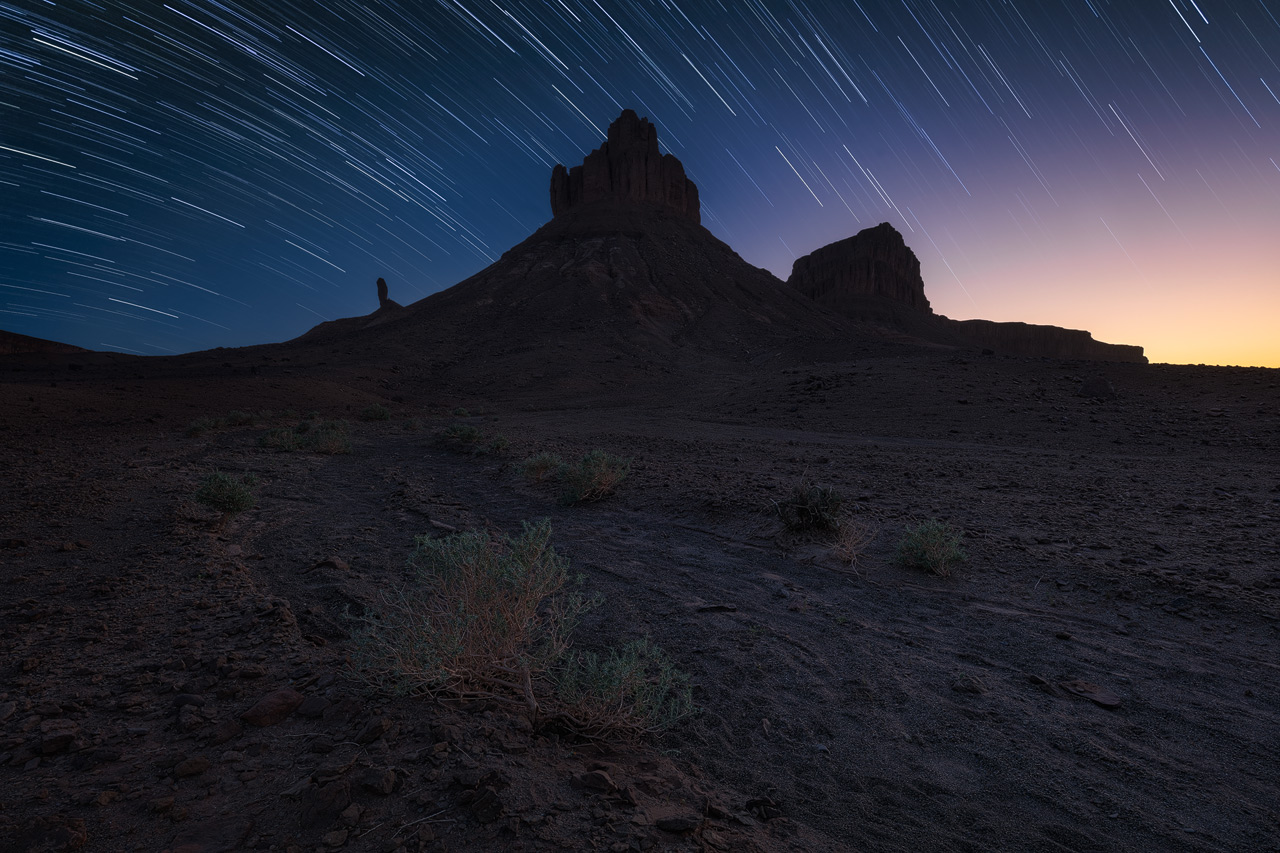
In this photo editing tutorial, I show my complete workflow for processing star trail photos. As with my other tutorials, you will learn advanced techniques for achieving high-quality results in your star trail photo editing.
To provide interest in such photos, I use a technique called time-blending to include the glow from twilight. If introduced subtly, this glow can serve as the light source and help to create a better result.
As usual, the workflow I show in the tutorial ensures the highest possible quality for the resulting photos.
The complete tutorial is more than 100 minutes in length. For a better viewing experience, I have split it into 11 sections. You can revisit parts of the workflow and incorporate a selection of techniques into your editing workflow.
After a short introduction video, I show how I planned and photographed the star trail photo, which consisted of 12 images for the star trails, one dark frame, and six photos for focus stacking and exposure blending.
Then I show the pre-processing in Lightroom, followed by the star trails stacking in Star Stax and Startrails.
I continue with noise reduction techniques in Photoshop before I share how I blended the photo. Blending is the most crucial part of the process and lays the foundation for further creative processing.
After some finishing touches in Luminar, I show you my multi-pass sharpening, which I use to enhance the details in the photo.
The preparation of the photo for the web concludes the tutorial. The print preparation is not included. I have very detailed tutorials about this topic available here for free.
This video tutorial is for the intermediate Photoshop user. I assume you are familiar with layers, masks, filters, and adjustment layers. If not, I recommend watching my free tutorials first.
I use Adobe Lightroom 6 and Photoshop CS6 in the tutorial. Photoshop CS5 or later is generally sufficient to apply the shown techniques. If you use Photoshop CC, you'll also have no trouble following along. Although this tutorial was recorded some years ago, I still use the techniques I show in my night photo editing today.
During multi-pass sharpening, I make use of filters from the Nik Collection, which is available for free. I also show an alternative, which uses just Photoshop filters.
Another Plugin I use is Luminar 3. It's use is optional, as many of the effects can also be achieved with Photoshop or other Plugsin.
I already mentioned Startrails, which is also free. I use it for blending the star trail photos.
Once a month, I'll send a roundup of new tutorials, articles, and other news about photography. If that's interesting for you, make sure to subscribe to my newsletter.