Blog - Woodland Photography Tutorial
photography-tutorials | by Michael Breitung
Few landscapes offer as many photographic opportunities as the forest. Few, however, appear as chaotic, and finding suitable compositions usually takes a lot of patience. However, if you can find order in the chaos, you can create captivating woodland photos.
And you usually don't need to travel far for this, which is a significant advantage compared to much other landscape photography. Although forests in Germany are retreating in many places, almost every region still has woodlands worth exploring for subjects. The same is true for many other countries in Europe and around the world. If you have a forest nearby, this article will help you rediscover it through the eyes of a landscape photographer. I show what to look for when exploring the forest, why a cold, wet morning is often the perfect time for photography, and how to capture detailed forest photos with the proper techniques.
Subject and Composition
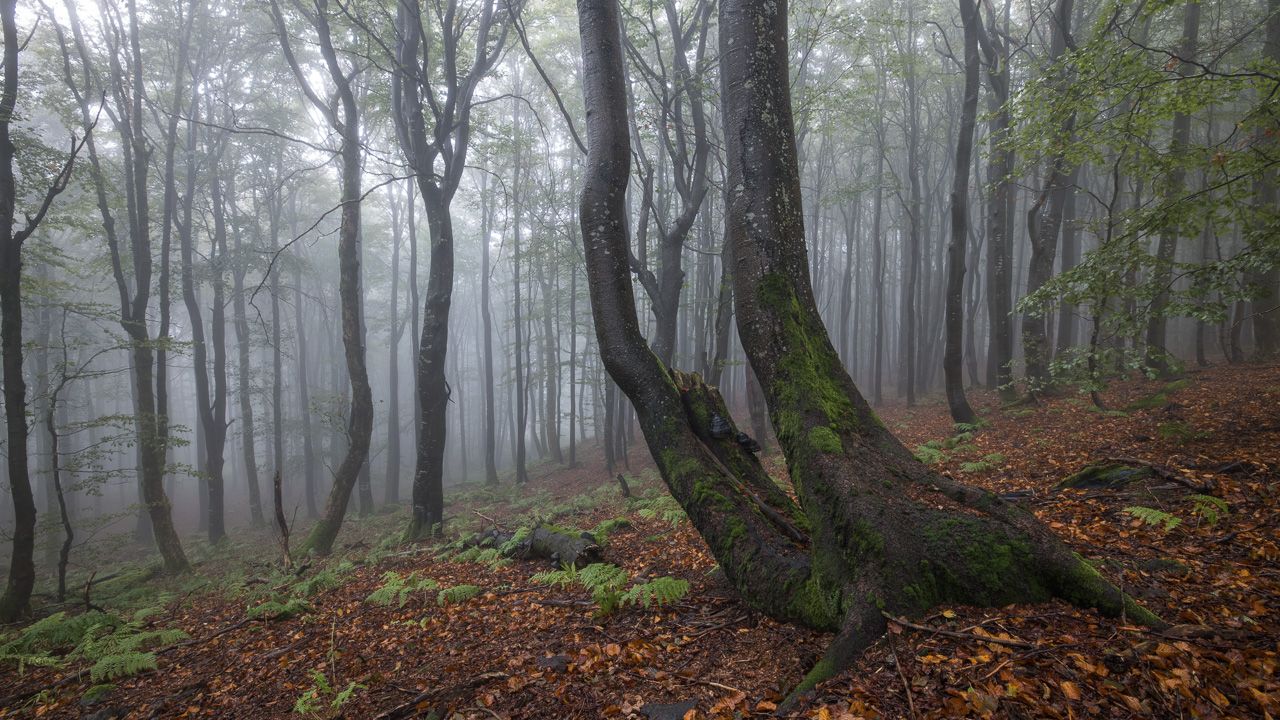
Finding suitable subjects in the forest isn't easy. Typical mixed forests often appear chaotic, with untidy forest floors that make composing an image difficult. The monotony of coniferous forests doesn't make things much easier either. While they tend to have a bit more order, they often lack trees with character.
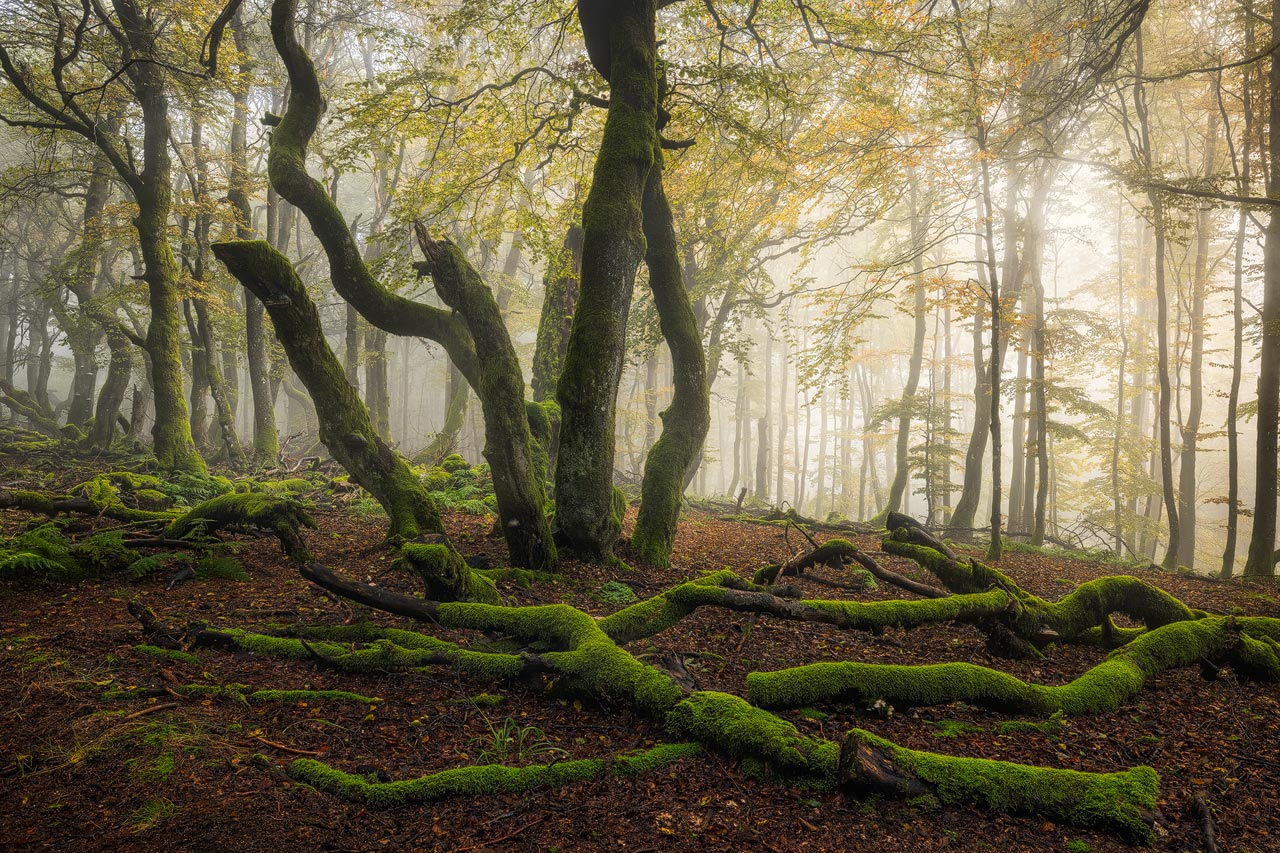
Beech forests are generally the easiest places to find good compositions. But even there, you still have to work on your subjects. Always take enough time for forest photography—get to know the forest first, revisit it if possible at different times of day and in other seasons, and don't shy away from exploring on rainy days.

Keep an eye out especially for distinctive trees that stand out from their surroundings. Use these as your main subject to create a clear focal point in the photo. Trees with branches that twist and turn in various directions can be beautifully showcased with a wide-angle lens, helping them stand out from their environment. If you find exposed roots, they can serve as an effective foreground. The branches and roots then form leading lines that draw the viewer into the image, as seen in the photo from Gorbea Natural Park in Spain.

This gnarled beech tree in Gorbea Natural Park stood out strikingly from its surroundings. One of its branches stretches far forward over the camera, creating an especially dynamic perspective at 16mm. The rainy weather and mist also lend the photo a mystical atmosphere.
You won't always find trees that can carry a photo on their own. In many forest images, the challenge is to arrange several trees harmoniously. Look for shapes in the trees that repeat themselves from the foreground through the midground to the background, and try to give the trees enough space to breathe.
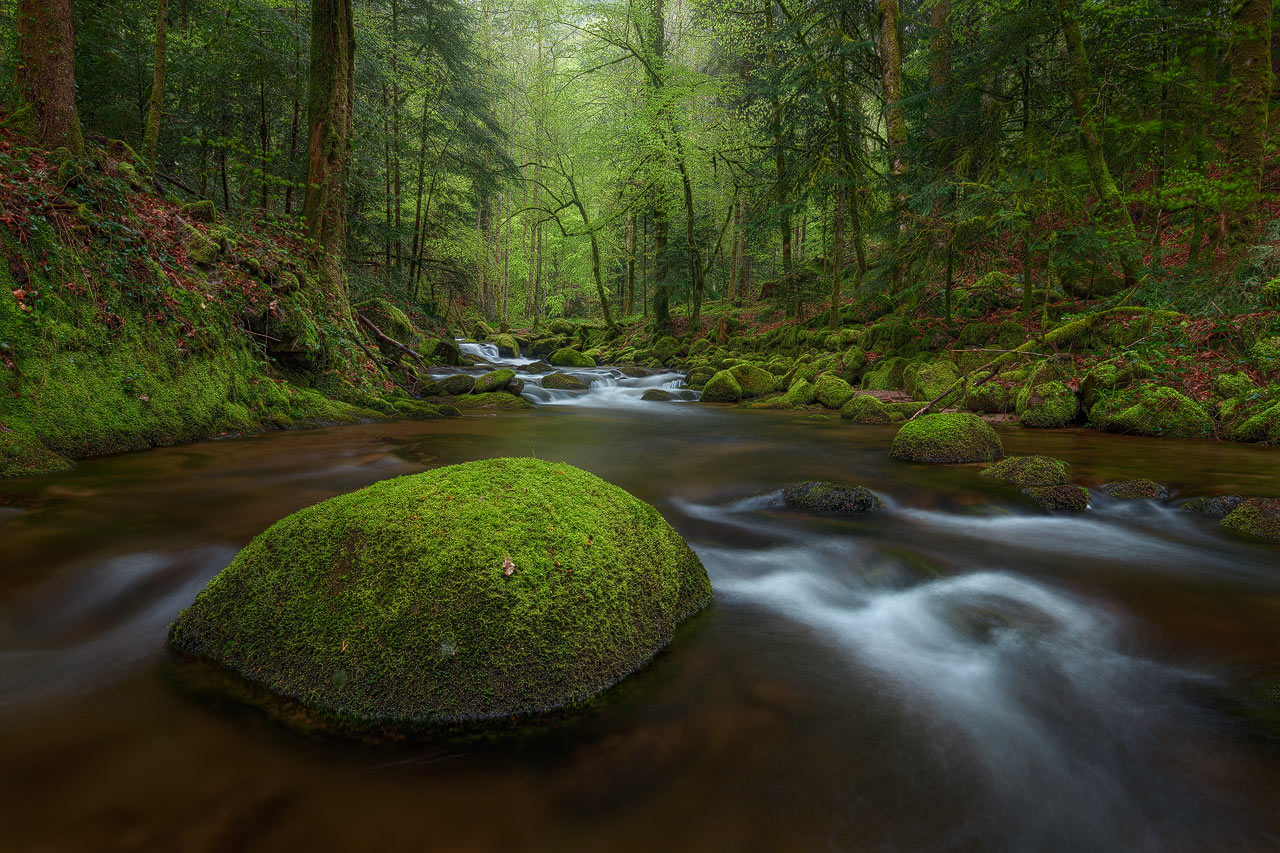
If the forest is too dense, this becomes almost impossible. Only paths and streams winding through the thicket can help you bring some order into your compositions then. Flowing water, in particular, can create a beautiful contrast with the surrounding vegetation, especially if you experiment with longer exposure times to soften the details of the environment. However, try to preserve some texture in the water so the contrast with the forest floor doesn't become too strong.
And that brings us straight to the topic of contrasts. You can use them to emphasize your main subject and to create depth. Areas with strong contrast naturally draw the viewer's eye, which is why you should avoid having too many of them in one forest photo. Too much contrast makes it harder to guide the viewer's gaze and adds to the sense of chaos.
That's also why it isn't easy to take convincing forest photos on sunny days. Direct sunlight produces very harsh contrasts in the image. It's better to photograph early in the morning or late in the evening when the sun is lower and casts much softer shadows. Especially when shooting against the light, your forest photos gain dimension and depth. Alternatively, you can work with reflected light, which works particularly well in the mountains where direct sunlight is often blocked.
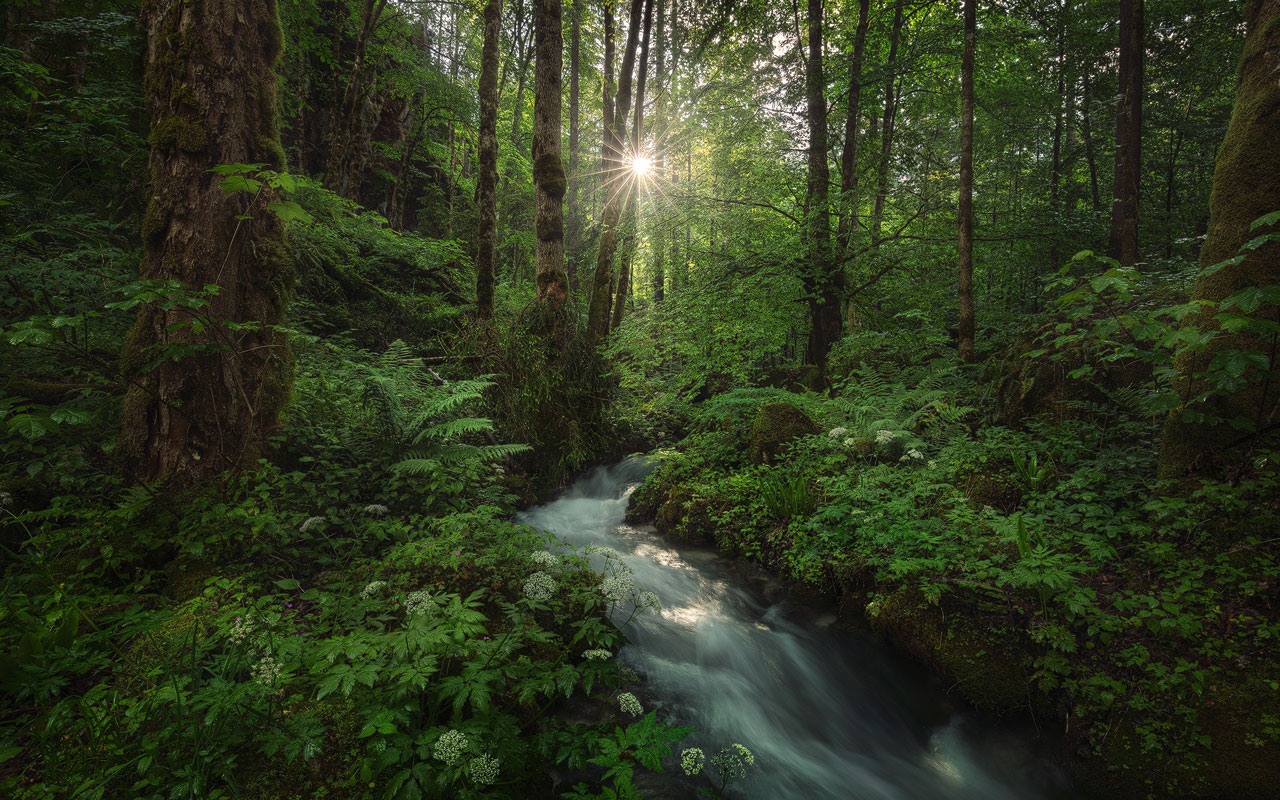
In this photo from the Enchanted Forest near Hintersee, water and light shape the composition. The stream leads the viewer from the lower right into the center of the image, where the low sun shines through the leaves. It creates a strong focal point that holds the viewer's attention within the photo.
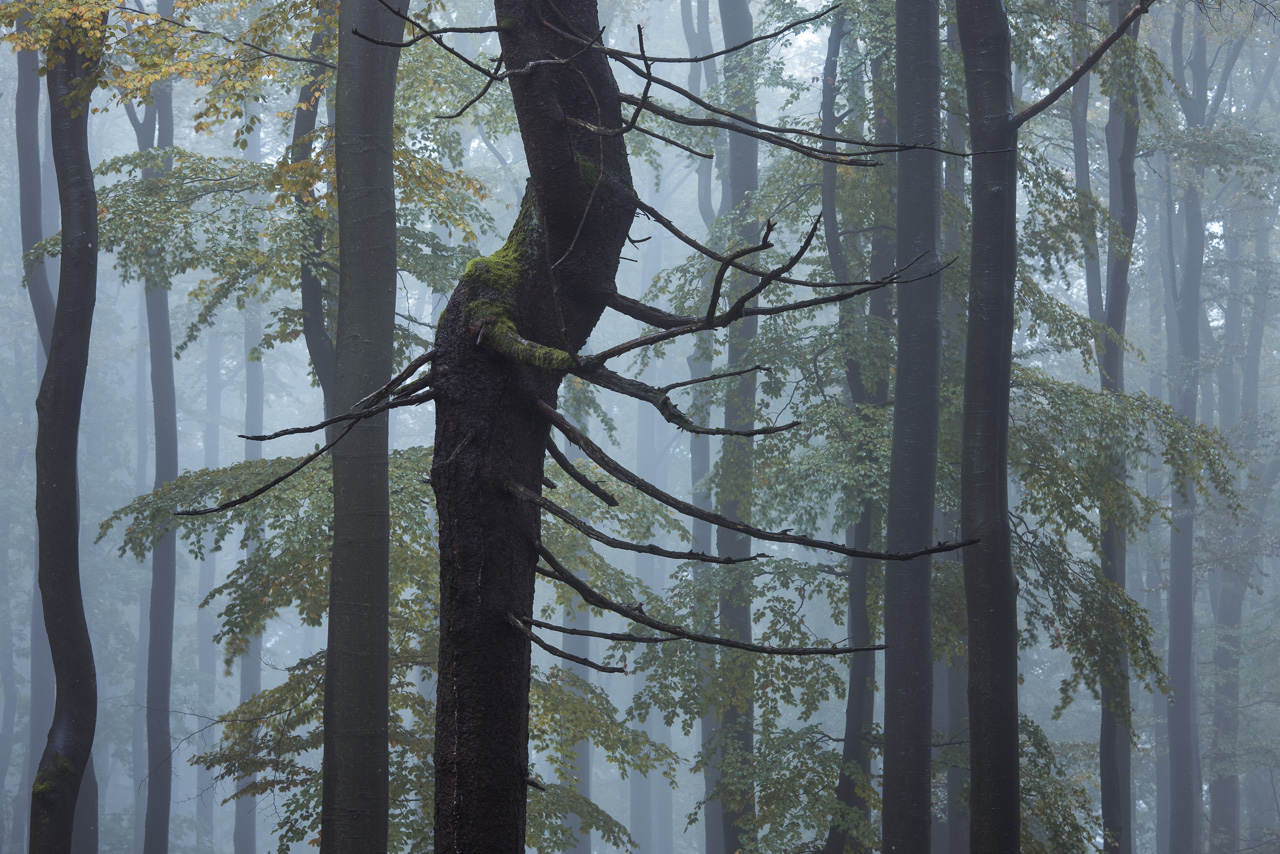
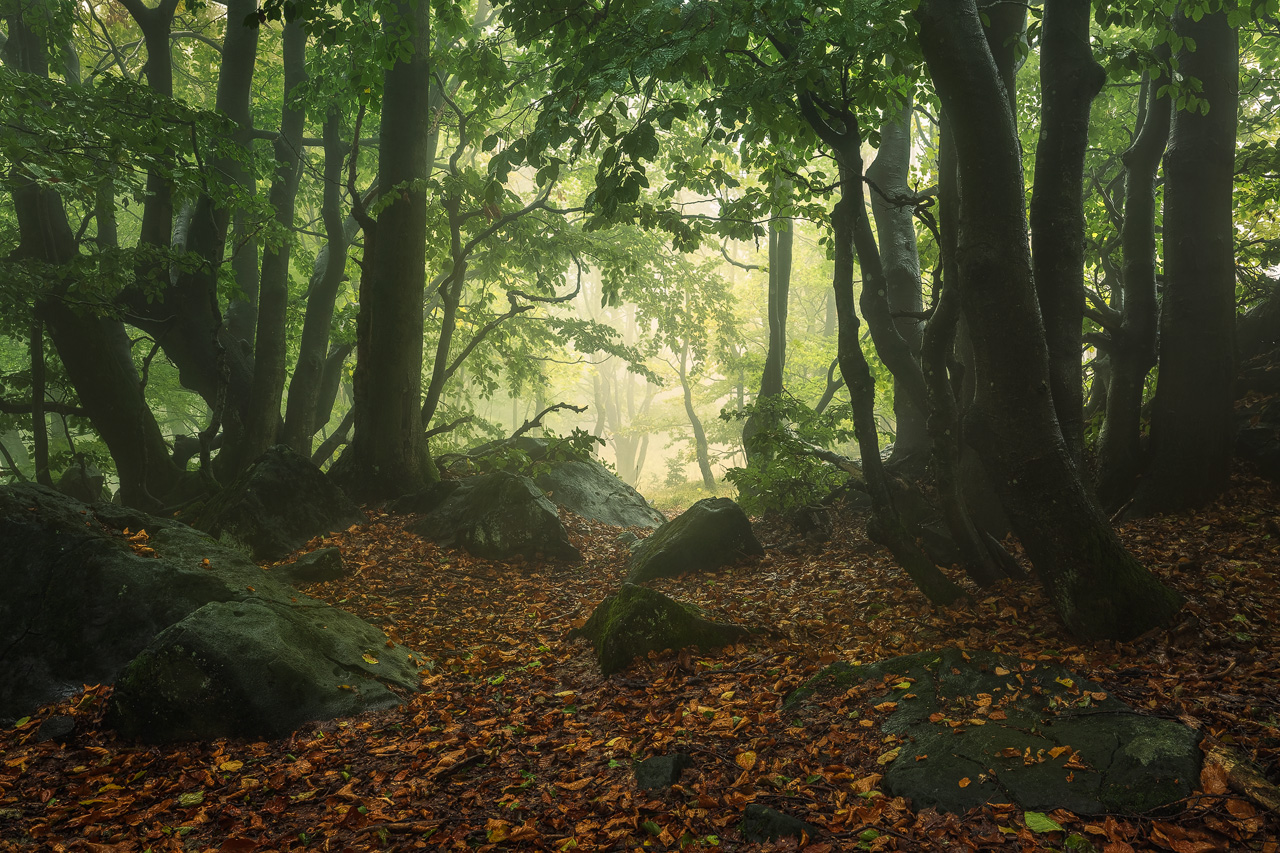
Another thing to watch out for when composing woodland photos is the sky. Try to include as little of it as possible in your frame. The areas where the sky shines through leaves and branches tend to produce the strongest contrasts in the image. These bright spots distract from your main subject and disrupt the composition. This problem is particularly pronounced when shooting with a wide-angle lens, as it's challenging to find a framing that excludes the sky. Dense canopies or ravines can help, as can fog.
What you can do yourself is work with longer focal lengths. Step back from your subject and zoom in. The narrower framing will automatically reduce the amount of sky in your photo. It also helps simplify the composition and can even allow you to exclude the forest floor entirely. The vertical lines formed by the trees bring a sense of order to the image. If you can find a tree that stands out with a different shape, you have the perfect recipe for an interesting forest photo.
For this photo from the German Rhön, I used a telephoto lens. The ground around this tree was very chaotic, so the decision was easy: zooming to 116mm to focus entirely on the middle section of the tree in the foreground, which, with its twisted branches, looks almost like a creature from a fantasy film.
Another approach you can use when searching for compositions is to look upward. When photographing with a wide-angle lens as the Canon 15-35mm f/2.8 *, this creates a strong vanishing point in the image. While the frame does include the sky, it now appears through the canopy at the center of the photo, drawing the viewer's gaze into the image rather than out of it. Such photos work best on foggy days, as shown in the example from Colombia.
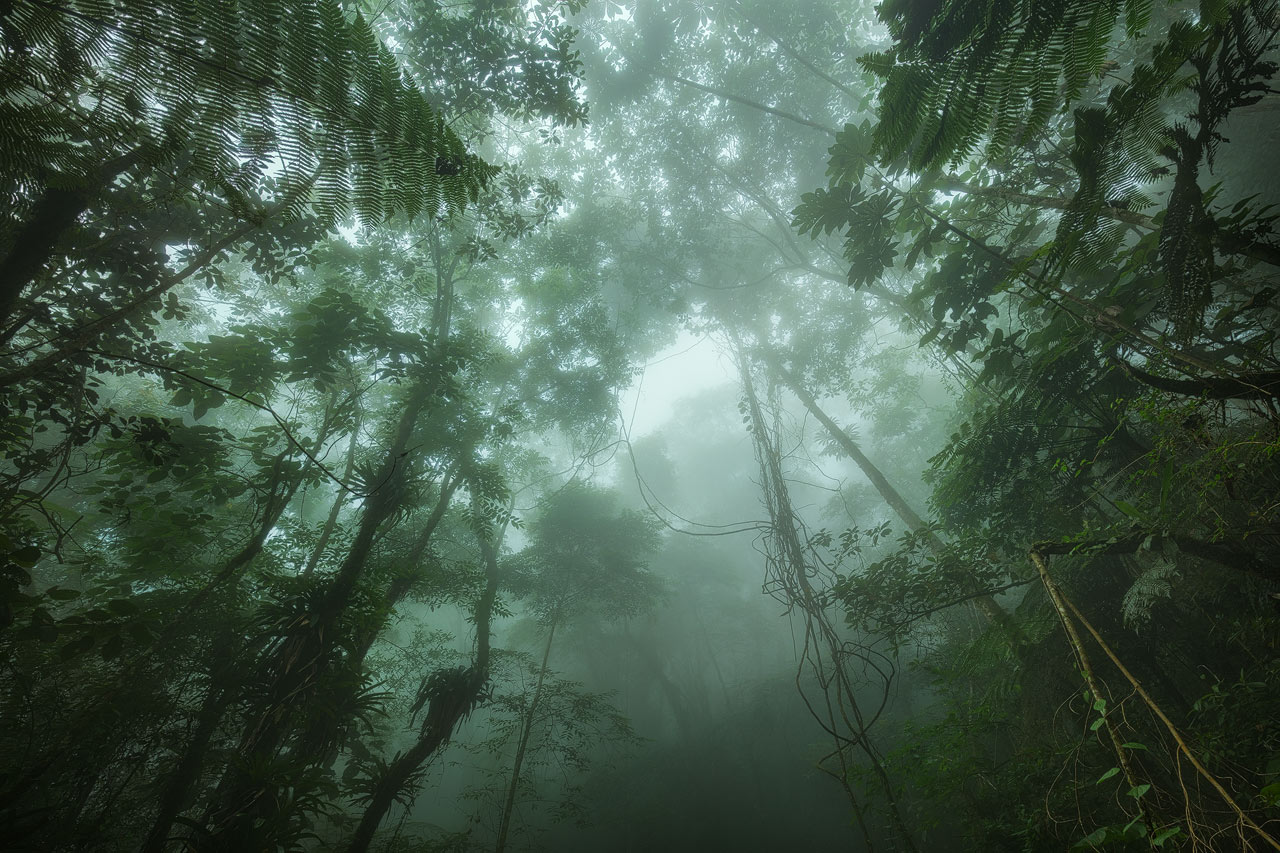
It wasn't easy to find an orderly composition in this Colombian forest. Dense undergrowth covered the forest floor. However, when looking upward, a tunnel effect emerged—the trees, the ferns, the branches—all pointed toward the center of the image.
Looking down can also be rewarding. Occasionally, you'll find beautiful still lifes right at your feet. Ideally, you'll have a macro lens with you for such opportunities. Still, even with a regular lens, you can capture interesting images if you move in close to the minimum focusing distance.
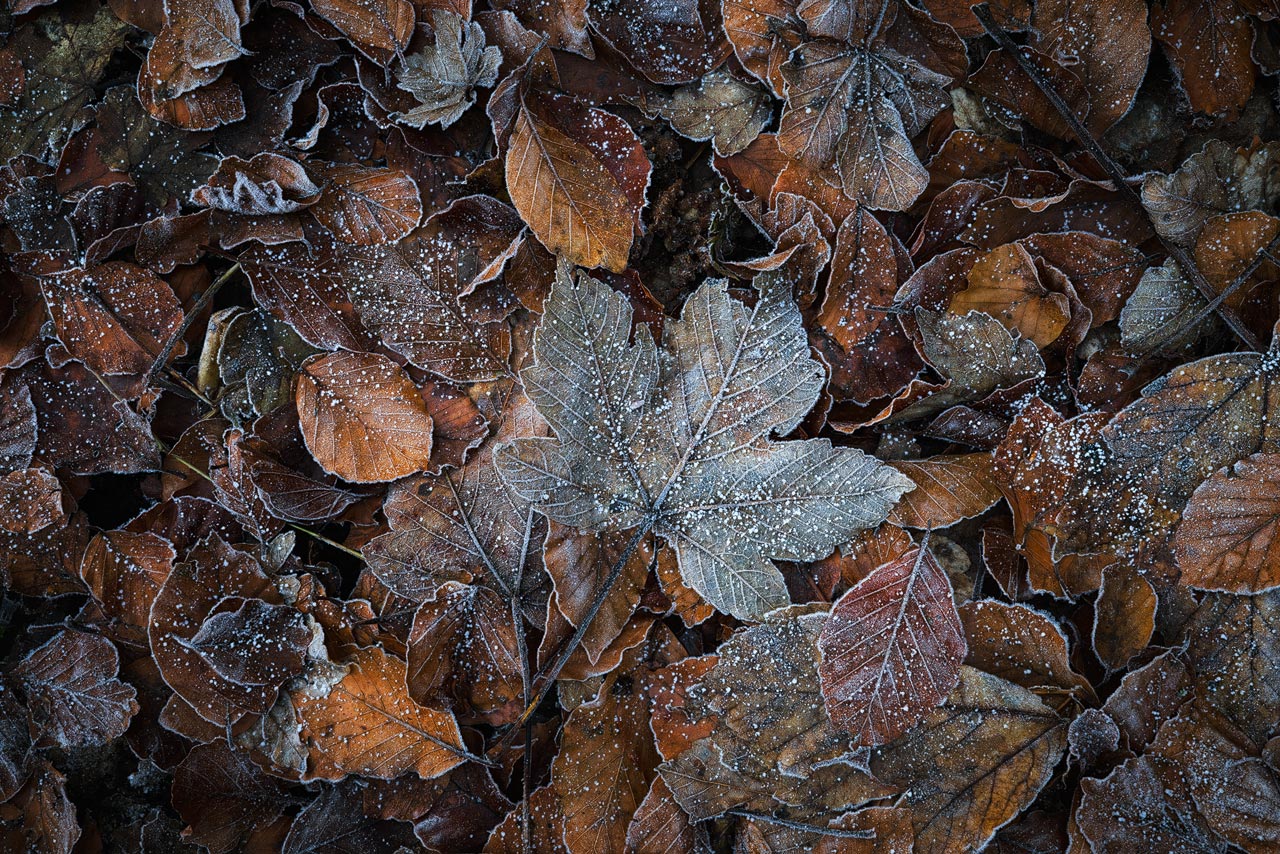
I captured this photo on a cold autumn morning. The trees had already shed their leaves, and the light wasn't ideal for forest photography—the contrasts between the forest and the sky were too strong. On the forest floor, however, there was plenty to discover.
Light and Weather
As you've probably noticed while looking through the photos in this article, one particular weather phenomenon keeps appearing: fog. It can do wonders for your forest photography. Fog creates depth, softens contrasts, and adds a mystical atmosphere. Even in mixed and coniferous forests, a foggy day can suddenly reveal photo opportunities.
Fog forms when the air cools and humidity rises. Once the air is saturated with the maximum amount of water vapor it can hold, tiny water droplets form—what we see as fog. Two key indicators help predict fog: the dew point and relative humidity.
When the air temperature drops to the dew point, humidity reaches 100%, and fog begins to form. But keep an eye on the wind, too. Too much wind not only makes photographing in the forest difficult—and sometimes dangerous—but also leads to much less stable fog conditions.
In Germany, you'll have the best chances for fog in autumn and spring. During these seasons, it often rains, and the forest floor absorbs plenty of moisture. At this point, watch the weather forecast for cold, clear nights. The goal is a day with a temperature below the dew point. Clear nights favor this, as the ground's heat radiation can escape into the sky without being reflected by clouds, cooling the air near the ground even faster. This effect is more noticeable in open areas than in the forest itself, but since forests often border meadows or bodies of water, fog frequently drifts in from those areas.
Like fog, rain creates a hazy atmosphere. It's not as dense as fog, and visibility in the forest remains greater, but depending on the strength of the rain, distant details gradually fade. So don't shy away from rainy days—use them to photograph in the forest; it's worth it. You might even capture that magical moment when the rain stops and the sun breaks through the clouds. The same can happen on foggy days—moments of light that transform the mood of the forest entirely.

Here, I photographed the same subject twice on a foggy morning. Yet the mood is entirely different in the right photo, because there's not only fog but also light. Capturing the interplay of light and fog in a forest is something truly special—and it's always worth heading out again and again for such moments.
Winter, too, offers spectacular opportunities for forest photography. Especially in higher, more exposed areas where wind drives snow and ice into the forest, scenes straight out of a fairy tale can appear. A thick blanket of snow simplifies composition by covering the often chaotic forest floor.
At the same time, snow wraps the trees in white, creating a monochromatic color palette and softening contrasts. In this case, the colder, the better: prolonged frost causes branches to freeze and ice crystals to form on the bark. Even simple, unremarkable forests gain a remarkable photogenic quality under these conditions.
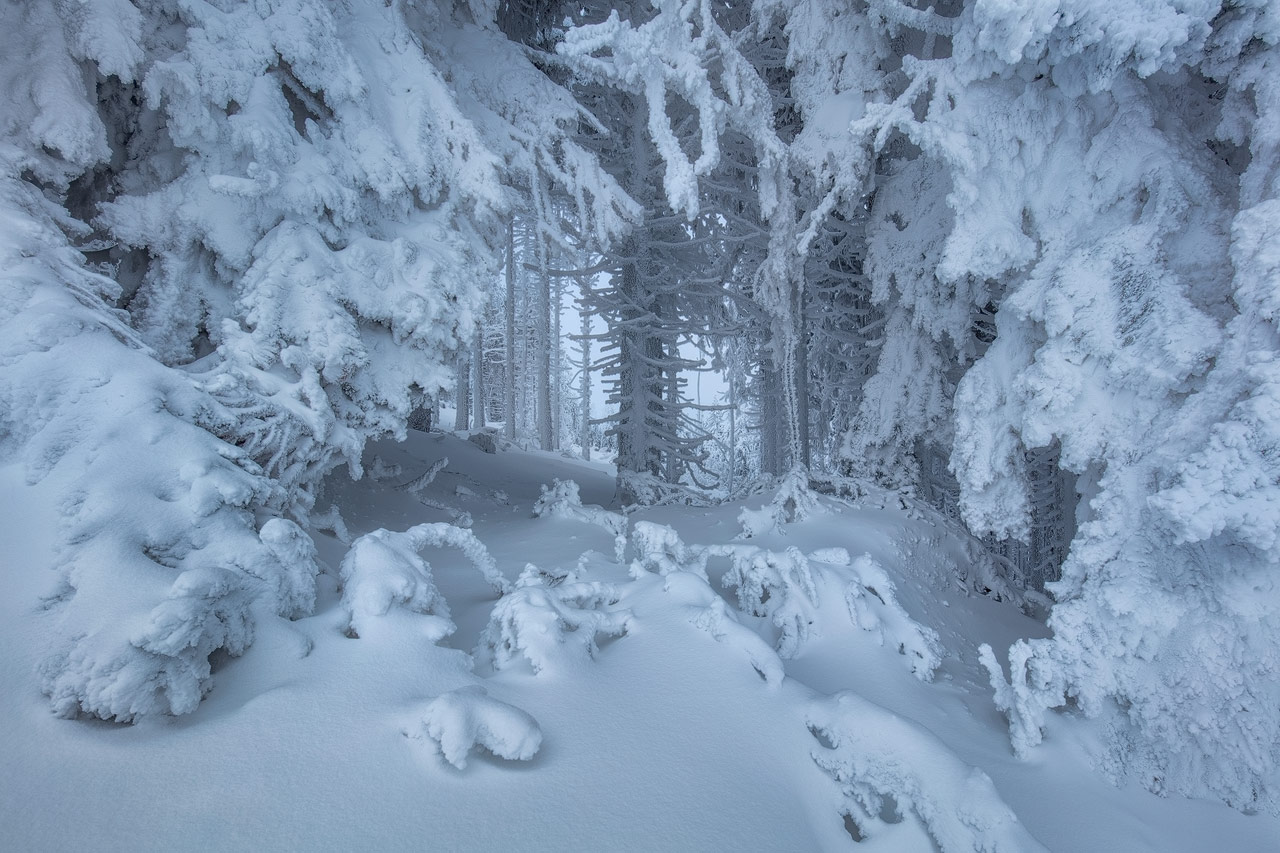
Ice and snow define this forest photo from Großer Arber. The muted, monochromatic colors reduce the image entirely to shapes and structures. The snow-covered forest floor appears clean and orderly.
Equipment
As in landscape photography in general, a tripod helps capture shake-free images even in the darker light conditions of morning and evening. Because forest floors are often soft, it can be advantageous to use a tripod with spikes that sink slightly into the ground, providing greater stability.
A remote shutter release is also useful. It lets you step away from the tripod before triggering the shot. Standing too close can cause the tripod to wobble on soft ground, resulting in slightly blurred images. Alternatively, you can use the camera's built-in self-timer.
And since, as you've already learned, a wet forest is ideal for capturing the best photos, it's worth bringing a polarizing filter. It helps control reflections on wet surfaces and enhances colors. One very flexible option is the magnetic polarizing filter from Kase, which eliminates the need for screwing the filter on and off.
Technique
When you're out in your favorite forest under perfect conditions, your photography shouldn't be limited by technical challenges. Photography is most enjoyable when you don't have to focus too much on camera settings and can instead concentrate fully on your surroundings and your subject. That's why it's helpful to adopt routines that ensure you capture your magical forest photos in the highest quality.
A lot of time can be lost trying to find the focus point that keeps both foreground and background sharp. While hyperfocal distance can help, who carries a meter to set it precisely? So don't stress—use focus stacking instead. Take two to four shots with different focus points and, back at home, either select the photo with the appropriate depth of field or blend multiple images for consistently sharp results. With modern cameras, use the automatic focus bracketing feature to capture a focus sequence in rapid succession, which makes editing later easier. It requires software such as Photoshop or GIMP that supports layers and masks. When focus stacking, use medium apertures (f/8–f/13) to avoid diffraction blur.
Another area not to worry too much about is perfect exposure. Even on foggy days, a scene's dynamic range can exceed your camera's capabilities. You can try to set optimal exposure using the live histogram, but often this is just a compromise. Don't settle—use exposure bracketing (-2, 0, +2 EV) and delete redundant shots later rather than discovering you're missing key details.
If you want to combine focus stacking and exposure blending, use the following technique:
- Capture a focus stacking sequence from foreground to background.
- Focus on the background and capture three bracketed exposures.
You don't need to capture bracketed photos for every image in the focus stack, since the high-dynamic-range areas are usually in the background.
For the best image quality, use low ISO settings, which may result in slightly longer exposures depending on the lighting. On calm days, this isn't an issue. On windy days, however, make it a habit also to take shots at higher ISO values to freeze movement in the leaves. Modern cameras produce very clean images even at ISO 800. With Lightroom's new AI noise reduction or DXO PureRAW - free 14-day trial here * -, you can get clean photos even at ISO 1600 or higher.
Just like with focus stacking and exposure bracketing, you can blend images taken at different ISO values—use the shorter exposures for the foliage and the longer ones for the forest floor.
This approach naturally yields many photos on location. If the workflow becomes routine, it barely distracts from the creative aspects of photography. And you can be confident that no pieces of the puzzle for your perfect forest photo are missing. As mentioned earlier, you may not need all the exposures in the end— select the best ones at home. In my Woodland Photo Editing tutorial, I show how to combine all the pieces.
I took this photo on a windy morning. To get a sharp image I had to combine focus stacking with blending of some high-ISO photos to freeze motion in the leaves.
In addition to camera settings, it's essential to watch out for converging lines when photographing in the forest. Try to keep the camera level to avoid them—your photos will look more professional if the trees appear straight in the frame. If you need to tilt the camera up or down to get the right composition, leave some space at the edges so you can correct the perspective during post-processing. As always in photography, there are exceptions: the photo from Colombia, shot looking upward, benefits precisely from the perspective created by the converging lines.
Photo Editing
The dreamy look in forest photos depends mainly on the right light and weather conditions. In post-processing, you can further enhance this effect. The key is working with the image's contrasts and colors. Avoid increasing global contrast too much; instead, apply selective accents to the areas you want the viewer’s eye to follow.
Pay particular attention to the dark areas of your photo - try to preserve detail and avoid letting them turn completely black. The same applies to the highlights. Use different exposures from a bracketed series to control the brightest parts of the image. Naturally, a photo can include white areas, but they shouldn’t dominate the frame.
Colors also play a significant role in setting the mood of your forest images. Adjusting the white balance can make a photo cooler, creating a gloomy, cold-morning atmosphere, or warmer, emphasizing the light.
For focus stacking, you have several options, which I explain in detail in this article about focus stacking for landscape photos.
If you also captured shots at different ISO values, layer masks can again help to selectively incorporate areas where you want to freeze movement in leaves and branches. Paint on a black mask with a 100% white brush with slightly soft edges. I show this technique in my detailed photo editing tutorial.
Of course, you don’t always need multiple exposures to blend. Focus stacking isn’t necessary if you want to use blur creatively in your photo. Especially with telephoto shots, reducing background detail can further emphasize your main subject. Bracketed exposures are becoming less necessary with modern cameras, but I still recommend them for achieving the best quality.
Often, you won’t even need Photoshop or GIMP then; Lightroom or another RAW converter can handle your adjustments. Again, watch your contrast—avoid pushing the black and white points to the extremes in the histogram. Use selective adjustments to guide the viewer’s eye, and a vignette can also be helpful.