Newsletter
Once a month, I'll send a roundup of new tutorials, articles, and other news about photography. If that's interesting for you, make sure to subscribe to my newsletter.

In this guide on how to print photos, I show you a workflow that will ensure high-quality results every time.
Step by step, I guide you through the photo print preparation I developed over the past years. I’ve applied it to many of my photos to great success. I cover the following topics:

A lot goes into the creation of the perfect photo print. The goal is to create prints that look the same or close to on paper how they appear on your monitor. To achieve high-quality results, you must first control those two ends of the process: your monitor and the paper on which you print.
The factory settings of even professional displays are often not 100% accurate. That’s why you should always calibrate your displays to ensure that the colors and brightness displayed on your monitors adhere to standards like the CIE Illuminant D65. It provides the foundation for a professional printing workflow aiming to produce prints that look the same on your displays as viewed under average midday light or in rooms lit by daylight lamps of a temperature of 6500k.
If your displays are uncalibrated, every adjustment you make to the colors and brightness of your photos is a gamble based on assumptions and maybe experience. It’ll be nearly impossible to create predictable results for your prints. And since those are not cheap, investing in a colorimeter like the Calibrite ColorChecker* or the Datacolor Spyder X Pro* to calibrate your displays should be a simple decision.
In my monitor calibration guide, you’ll learn everything you need to know to perform a monitor calibration.

Accurate presentation of colors and brightness is not only important on your displays. You must also choose a paper that can sufficiently display the gamut of your photos. Many different photo papers exist these days. Some are great for vibrant images, and others are better for black-and-white photography.
Finding the best paper for your photos will require some experimentation. But it’s something you should do early on. It doesn’t matter if you print at home or use a lab for printing: select a few photos and try different print options.
Since this can be a long process, I will give you my two favorite options for color photos:
As you can see in the provided links, I use Whitewall as my lab of choice for printing.
My typical photo editing workflow starts with RAW editing in Adobe Lightroom, continues with creative edits in both Lightroom and Photoshop, and results in a PSD master file. I use it to create photos for different outlets like web and printing.
While publishing a photo on platforms like Instagram or Facebook doesn’t require additional work besides resizing and web-sharpening, preparing it for print is more involved. The first step is to clean up your master files and remove any flaws that could be visible in a large format print.
Removing sensor dust, color fringes, noise, and sharpening artifacts are just a few examples of imperfections that are usually not visible on the web but will become very apparent in print. I show how to remove those in the video below.
Doing this cleanup in the beginning and on your master files is essential. You must then only do it for the first print you prepare. Next time you want to create a print of the same photo, it will already be flawless.
I use the color space ProPhoto RGB for all my master files. It is the largest color space available in Lightroom when exporting a photo to TIFF or Photoshop. By using it, you gain the most flexibility in your editing workflow. You then have the option to decide upon a target color space at the end of your photo editing workflow when you prepare your photo for different outlets.
You might ask if using such a big color space can lead to problems if your monitor cannot fully display it. It is true that you’ll not be able to see the colors of your photos in their full vibrancy because the ProPhoto color space will be mapped to the smaller color space or your monitor. I, for example, have just an sRGB monitor. But I still keep ProPhoto as my working color space because someday I will upgrade my screen to a wide-gamut display, and I want my photos ready for it.
And as long as you convert the ProPhoto color space to a color space that your monitor can display when you prepare your photos for web and print, you’ll be fine. Because then you’ll see the representation of colors as they appear on your output medium. It is also why I still convert my photos to sRGB before I send them to Whitewall although they also support Adobe RGB.
If you test a few different photo papers, you’ll realize that the colors and brightness of your photos look different from what’s displayed on your calibrated monitor. For some papers, the difference is only minimal, while the color shifts can become very noticeable for others.
It is normal and the reason you must soft-proof your photos before printing. During that process, you simulate the paper and ink in software like Lightroom or Photoshop on your display. With the simulation active, you can then make adjustments to colors, contrasts, and brightness to make the image look the same as the original again.
I show how this process works in Lightroom and Photoshop in the two videos below. Other photo editing software will have similar soft proofing modules.
Do not make the soft proofing adjustments to your master file. Either create a virtual copy in Lightroom or save a separate TIFF file in Photoshop.
For soft proofing to work, it’s important to choose a lab that allows you to download ICC profiles for the different papers they use. Whitewall has a dedicated page where you can download their color profiles.
If you print at home, you should check that the printer you buy comes with proper color profiles. Those are usually installed with the printer driver. But, depending on your paper choice, those profiles are not always correct. Some trial and error will usually be involved until you understand how your printer reproduces colors on your desired photo paper. If you use Lightroom, you can create a preset that will adjust colors and brightness.
If you follow the process I show in the soft proofing videos, you’ll now have a separate TIFF adjusted to match the colors of your master file when used for printing on the paper you profiled against. Open this TIFF file in Photoshop or the photo editing software of your choice to resize it to match your desired print size.
For best quality, you should set the resolution in your resize module to 300 dpi. Then, dial in the target size in centimeters or inches, select a resampling algorithm, and let your software perform the resizing. For small enlargements in Photoshop, I use “Preserve Details 2.0”. For print size reduction, “Bicubic Sharper” does a good job.
If you require enlargements of more than 1.5 times the original size, you might need special software like Topaz Gigapixel AI. Those tools can give you superior results to Photoshop. But they also introduce artifacts. In addition to upscaling your images with such special software, you should always perform a normal resizing in software like Photoshop. You can then load both resizing results into separate layers and selectively apply the result you like best.

Once the photo has been resized, it’s time for the output sharpening. I use the “Output Sharpener” of the Nik Collection Version 4 for it. It’s free and still works with the Creative Cloud versions of Photoshop and Lightroom.
I use the following settings for best results:
Note that those settings will look over-sharpened when viewed at 100% on most displays. You must set the zoom to “Print Size” in Photoshop to get a proper representation.
You might also want to mask the sharpening effect on some areas of your photos, for example, the sky. For it, always keep the original, unsharpened layer in addition to the sharpening layer. You can then apply a mask to the sharpening layer and selectively mask out the effect with a soft black brush.
C:\Program Files\Adobe\Adobe Photoshop 2024\Plug-ins under Windows.C:\Program Files\Adobe\Adobe Photoshop 2024\Plug-ins\Google\Color Efex Pro 4.Once you start Lightroom or Photoshop, the Nik Collection should be available. To apply an effect from the collection in Photoshop, you must create a new layer and then apply the effects directly to that layer to avoid crashes. Don’t let the plugins create a new layer for you.
Before you save your sharpened photo and hand it off to a lab or use it to print at home, you must convert the color space to what your lab or printer can handle. As I mentioned above, I use sRGB as my target color space. In Photoshop, head to “Edit - Convert to Profile”, select the proper “Destination Space”, the “Engine” “Adobe (ACE)”, and the “Intent” “Relative Colorimetric”. I also have “Use Black Point Compensation” and “Use Dither” active.
It doesn’t matter if you print at home or use a lab to do the printing for you: before you order an expensive print, you should do a test print. Such a hard proof allows you to check colors, contrasts, brightness, and sharpness against the original photo displayed on your calibrated screen.
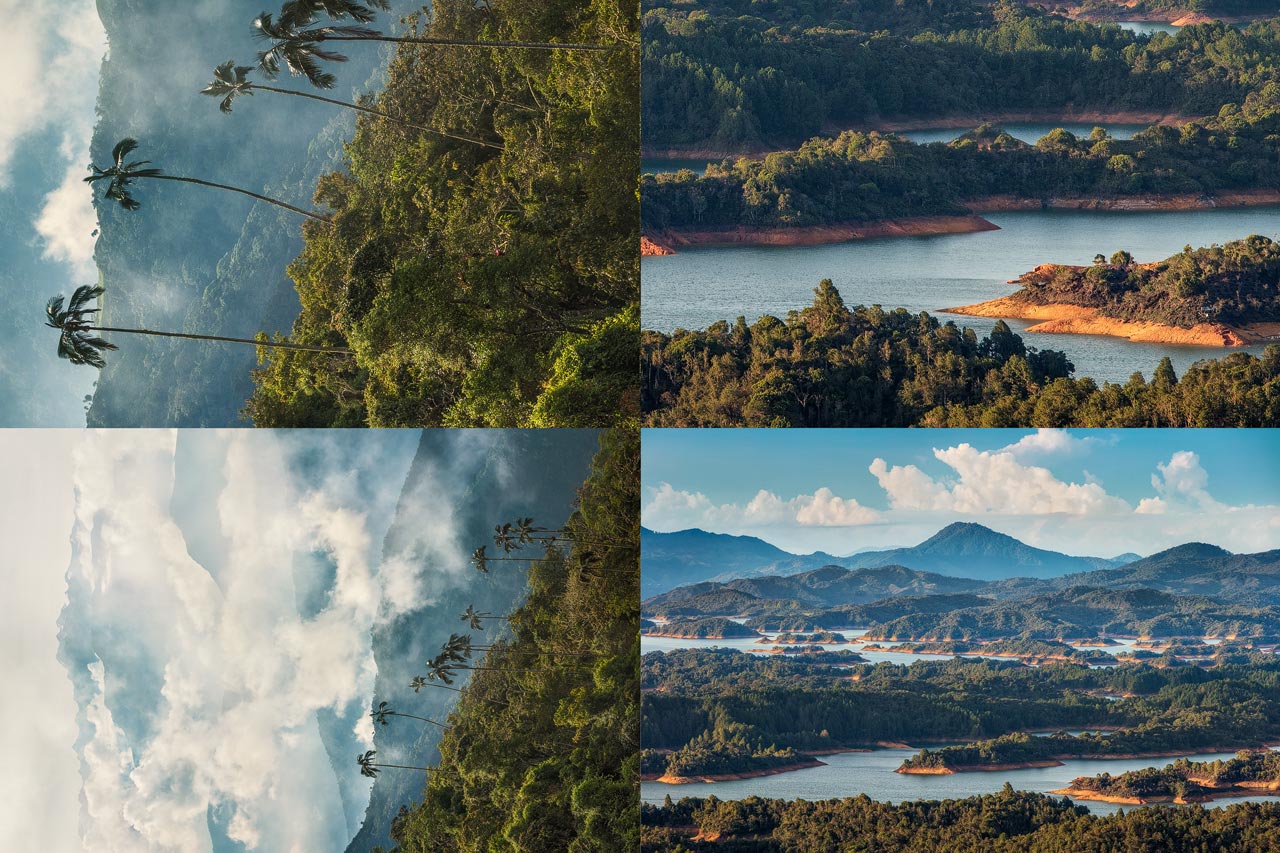
Services like Whitewall have a “Test Print” option, which reduces the price for such a print. You can further reduce the cost by creating a collage of multiple photos you want to proof. An example is the two photos from Colombia I sold to a customer in the UK. Before ordering the large 90cm final prints, I had to make sure they’d look perfect. I ordered a 60cm x 40cm test print on the paper I planned to use for the final print. I placed two 30cm x 20cm versions of the photos next to two 100% crops.

The crops allowed me to check the sharpness of the final print. The resized versions are for comparing colors and brightness against my master files.
I create such proofs for all the photos in my shop. It’s an inexpensive trade since I only have to do it once and can then be sure that all prints afterward will look correct.
A good frame with high-quality glass is at least as important as the paper and print itself. If you put low-quality glass in front of a print, you diminish its representation. You get reflections, color shifts, changes to contrast, and sharpness.
Because of that I decided to, from now on, use photo frames by Halbe Rahmen for my photos. In the video below, I show you the museum quality you get if you buy one of their frames.
You’ve now learned everything it takes to create high-quality prints. Performing this workflow a few times from start to finish will give you more and more confidence, and with time, you’ll be able to create predictable results on a constant basis. And don’t get discouraged by a few mistakes along the way. If you create test prints, those will not be expensive. Learn from them, tweak your settings, and become a pro at printing.
* Those are Affiliate Links. I get a commission if you buy or book something after clicking on those.
Once a month, I'll send a roundup of new tutorials, articles, and other news about photography. If that's interesting for you, make sure to subscribe to my newsletter.
