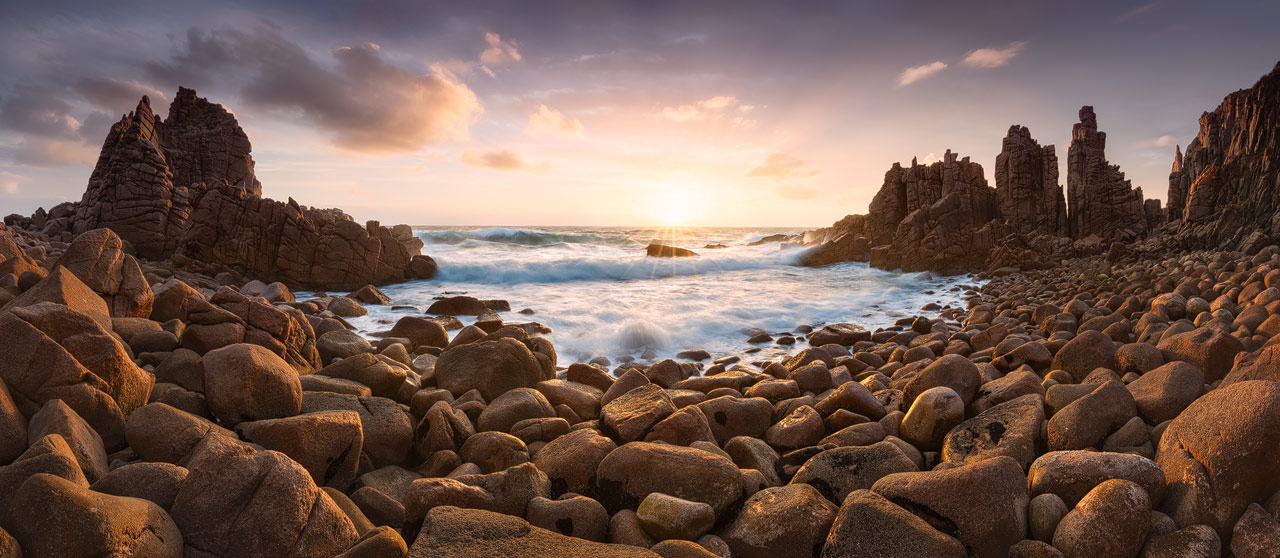
Michael Breitung Photography

MICHAEL BREITUNG PHOTOGRAPHY

Panorama Tutorial Part 2

In Part 1 I showed you my Priest Cove panorama photo and described what equipment I used for it. Now I will go through the individual steps that were needed to photograph it.

First comes the preparation, which I do for every Panorama I take. It will ensure that I get ideal raw material for the post processing and stitching work. And as I’m talking about raw material I mean photos taken in RAW format. I never take Jpeg photos. RAW just provides much more image information to work with and helps to ensure best image quality in the end. It also makes things like adjusting of whitebalance much easier, especially for panoramas.

So lets go through the steps:

  1. First I remove my Polarizer or any filters which may result in an uneven lighting. Stitching polarized shots is a pain since the brightness and contrast in the sky vary in every frame. My Lee GNDs I might leave attached depending on the situation. But I’ll try to keep the gradient horizontal then.
  2. Composing the shot and setting up the tripod:
    • I have either a Panorama Head or panoramic plate attached to the Tripod and adjusted so the shots will show no paralax error.
    • First of all I will leave the tripod where it is and walk around with the camera alone to find the right spot and to get an idea about the composition. A tripod would hinder me during this scouting. When I have found a good place I look through the viewfinder of the camera and turn around, holding the camera in portrait mode. I then try to previsualize how the panorama will look. Here I always have to keep in mind that lines parallel to me will bend after the stitching. And if I want an object in the lower part of the frame in the final panorama, I have to leave some space below it – during the stitching I will always loose a bit at the bottom and top of the panorama.
    • I remember the place and get the tripod.
  3. Now lets have a look at the Camera and Lense Settings I usually use:
    • Since I use a tripod I’ll use the lowest ISO setting of my Camera.
    • Usually I leave whitebalance at auto because I can easily fix it in raw. If I want a better preview in camera I sometimes set it to a fixed value for all shots.
    • More important is setting the expsure mode to manual. I want all the photos of the panorama to use the same exposure. Else the stitching software might try to fix changes in brightness and this looks aweful. The first manual exposure setting, which I check, is the aperture. For panoramas I use f/13 most of the time. This gives me a great DOF on my wide angle lense and still shows nearly no diffraction. f/11 in portrait mode sometimes lacks a little sharpness in the lower (near) part of the frame.
    • I also activate bracketing in the Camera Menu. My Canon does bracketing of three exposures. I use the -2, 0, +2 sequence nearly all the time. This gives me the needed dynamic range.
    • Next I make sure the 2 second release counter is active. I use it together with my cable release, but even without a cable release it’s usually enough to reduce unwanted vibrations of the camera. The 2 second counter together with bracketing will take all three exposures in one cycle.
    • I turn on live view directly before starting the sequence. It’s helpful to check the setup a last time by turning the Panohead while looking at the live view. But more important for me is the fact that when using live view, the mirror of my DSLR is already turned as needed for capture. No additional vibration will be caused by the mirror. DSLRs also have a mirror prerelease. But I don’t use it for panoramas because it doesn’t work well with bracketing and it slows me down.
    • Live view is also my preferred tool for manually setting the focus. When zoomed in at 10x magnification it’s easy to find the sharpest setting. The hyperfocal distance can be used as a guide here. It will ensure a sharp shot photo from the nearest objects to infinity. With f/13 one focus setting can usually be used for all shots in the panorama. Only in very rare situation I need to readjust between the shots.
    • What’s still missing is the setting of the shutter speed. Because a panorama can have a huge dynamic range, especially when the sun is in the frame, this can sometimes be a bit tricky. With bracketing active I have three bars showing in the exposure window on top of my Canon camera. Those indicate where the -2, 0 and +2 exposure will be relative to the normal exposure the camera measures when half pressing the shutter. While turning the Panohead with the camera I take a close look at those bars and repeatedy half press the shutter to measure the exposure. I want to set the exposure time in a way that the left bar will always be to the left or the scale and the right bar will always be on the right. I’m trying to find a balance here and in combination with some GNDs it’s usually enough to capture the whole dynamic range of the panorama.

So this is my usual workflow. It might sound as if it takes forever. But actually most of the steps I do kind of subconciously and it’s quite fast.

One last thing though. In some pictures with the sun in the frame I might get lense flares. If possible I then wait till the sun leaves the scene behind some rocks or clouds, I adjust the shutter speed and retake the panorama the same way as before. Or I just retake the frames that show lense flares. Either way it will involve some addtional blending in Photoshop later. But the result will be much cleaner.

Amazon.com