Blog - Seascape Photography Tutorial
photography-tutorials | by Michael Breitung
Seascape Photography can be very dynamic. That's why the coast is one of my favorite subjects to photograph. To get the most out of the ever-changing scenery and to ensure my camera equipment stays dry, I follow the workflow I share in this tutorial on seascape photography.
In the article, I cover the following topics:
- How to research photo locations at the coast
- How to plan a seascape photography trip
- How to do on-location scouting at the coast
- The importance of adapting to changing conditions
- How timing and patience influence a seascape photo shoot
- In-the-field photography workflow
- Exposure blending techniques for seascape images

Researching Photo Locations
It's good to know beforehand what type of photos you want to capture during an upcoming seascape photography tour. There are different kinds of seascapes, and on many photo trips, you won't be able to photograph them all.
An example is dramatic coastal scenes with waves exploding on the shore. You'll likely be disappointed if you expect to take such photos during a trip to the Baltic Sea. You should at least have a rough idea of how the coast you want to photograph looks.

Use Google, Flickr, Instagram, and the catalogs of photo agencies to search for images of areas you want to visit. On Flickr, you usually find the EXIF data of the photos. It contains the date a photo was taken and helps to put it into a seasonal context. After a first overview, pick out appealing images and find out where they were captured.
For images containing geotags, finding photo spots is easy. On Flickr, some photographers use the integrated map to mark the locations. It is also a great help. Beyond that, use the keywords and description to locate a seascape photo spot. If you want to be precise, use Google Earth and try to find the depicted view. There might be a characteristic bend in the coastline, a set of large sea stacks off the coast, or an island at the horizon, making the coastal scenery unique. Try to find those on the map.
You can then collect all the information in OneNote or a similar note-taking app. Ensure the app you use can synchronize the data among several devices and that you can access it offline. I explain my process in the video below.
Despite this research, try not to concentrate too much on a single photo. For me, the goal is not to copy an image I've seen online. I use those photos to get an impression of how an area looks. It helps me to find places that have the potential for a successful seascape photography shoot.
Planning a Photo Tour to the Coast
Once you know the location of your next seascape photography adventure, it's time to plan it. During the planning, try to answer questions like what time of the year you must visit to get the best conditions or what tides and swell you need to capture the desired photos. You also want to know how accessible the areas you want to photograph are and how to get there.
The EXIFs in some of the images you find during the research can provide a first hint of how the sea looks during different seasons. Take photos of Porthleven, for example. The most spectacular images of that place are taken in winter when storms roll across Cornwall.
You should also take the position of the sun into account. A few years ago, I visited the Algarve in October. In autumn, the sun rises and sets over the sea in the southeast. It allowed me to include it in many of the photos I took of this south-facing coastline.

In summer, the sun's trajectory is more northward. For the photo of Praia da Marinha above, it would have appeared over the land to the left, and the composition wouldn't feel balanced. I use Planit Pro and PhotoPills to ensure the sun is in the right place for my photos. With those apps, I also plan my night photography shoots. I've written a detailed article about night photography at Fstoppers.
Once you know during which season to travel, you must check the tides. Those can make a difference of up to 12 meters in the water level in some places. For example, if you want to photograph a specific cove for sunset, it should not be submerged at that time. You can get a free, long-term tide forecast at Tides4Fishing. Once the date of your photo trip approaches, you should also use sites like magicseaweed or Surf Forecast to check the swell at the location you want to photograph. Together with the weather forecast, it can be nearly as important as the tides to predict accessibility and water levels at a seascape photo spot.

The image above, for example, was taken on the Costa Rican coast during an evening of incoming tide and large swell. It allowed me to capture very dynamic seascape photos. If I don't have such an elevated viewpoint, I prefer to take images during the receding tide. This way, I don't have to worry that the incoming tide will cut off my way back. Plus, I don't have to deal with footprints in the sand.
You should also have some alternatives to get the most out of a photography trip to the coast. I usually plan a visit to the best photo spots in congruence with the tides. For days when the water levels or the weather prevent access to those, I head to locations not impacted by it.

You should also know how to get to the desired locations. Often, a rental car is required. In more exotic locations, where you can't rent a car, you might have to get a scooter or hire a driver. Figure it out in advance, especially if you only have a few days at a location.
Hikes might also be involved. In that case, research the trails and their conditions. Outdooractive is a good source for planning a hike. In some areas, you should also educate yourself about the local fauna. If you plan to visit a location with poisonous snakes and spiders, you should know about it beforehand. Then you can dress appropriately, especially if you have to do bushwhacking.

Scouting at the Coast
Scouting is the most essential part when it comes to successful seascape photography. Even if you skip the first two steps while traveling through the world, ending up in different locations, don't skip the scouting.
If I arrive at a location just in time for sunset, run to the beach, and set up my tripod, it might not be the ideal spot. Instead of taking mediocre photos in a rush, I should use the last light to find a good composition for sunrise photography the next morning.
There are exceptions. Sometimes, I just showed up at a cove and was able to take a good seascape photo. But for a great image, you should plan in time to explore. The photos you might have seen during the research of a place only represent other photographer' points of view - a filtered reality. During scouting, try to take in all the scenery to find our own, unique perspective. Use your cell phone and camera, and look for potential compositions. Take test photos you can review later to decide what works best. Then, during the photo shoot you know where to go and how to set up your camera.

Scouting will also help you understand how the water level changes the photo opportunities at a location. Submerged rocks might reveal themselves as the tide recedes. It's good to know beforehand where they hide. Using a tide table, you should check if the water will be higher or lower during your planned shoot than during scouting.
Try to also imagine how a scene will look in a different light. Think about what kind of sky would best complement the landscape in front of you. Or think about what compositions will best work under different conditions. Try to find compositions for various types of light and weather.

Adapting to Changing Conditions
The sea is dynamic, and despite all the planning and scouting, you never know what you'll face on the day of a photo shoot. Previsualization is important, but flexibility is key when conditions don't align with expectations.
After the preparation, you should have a good foundation for a shoot. If you do proper scouting, you'll also be able to adapt to different weather conditions and find compositions to fit different cloud patterns. Embrace the gloomy mood of the blue hour if the colorful sunrise or sunset doesn't happen. Look for shapes that emphasize its feeling of mystery.
During travels, you sometimes only have a few chances to photograph a location. And if things don't fall into place the way you want, it doesn't mean you can't create a good photograph. In that case, try to make the best of the conditions you have. I did that at Wharariki Beach in New Zealand a few years ago. The cloud cover prevented any spectacular light from illuminating the scenery, so I focused on capturing the gloomy atmosphere of this early morning at the coast.

You can also look for details like patterns in the sand or intricate rock structures. If you find a subject that doesn't include the sky, you can take photos in nearly any light and weather. Take the image below, for example. I took it at noon on a cloudless day. All I had to do was find a shaded area with these fantastic rocks that I found very characteristic of Praia do Castelejo, which I visited that day.

Timing and Patience
In seascape photography, I rarely get the photo I want with just one click of the shutter. I usually take more photos even if I got a great result on the first try, just in case the light gets more spectacular, or the wave patterns become more artistic.
It's both timing and patience that lead to a great seascape photo. Timing is essential in seascape photography to release the shutter at the perfect moment. Sometimes, it's just before a big wave breaks on the shore, sometimes when the water flows back into the sea. A combination of both will yield the most interesting motion in many situations.
To get the timing right, watch how water and waves behave - try to identify patterns and anticipate the movement of the sea. But also, be prepared for the occasional wave breaking that pattern to stay safe and keep your equipment dry. To not miss the perfect moment, use the continuous shooting mode of your camera and a cable release.

For the photo above, I first observed the scene for a few minutes. I saw that after some smaller waves, a big one would usually hit the shore to create a huge fountain of spray. I then waited patiently after setting up my camera. When a big wave started building up in the cauldron below, I was ready to release the shutter.
But you don't have to capture everything in a single photo. You can also combine several images for the best result during photo editing. I show an example in the video, where I blend several images of the same scene showing different types of wave action. Loading those photos into separate layers in Photoshop and then using a soft brush to mask in parts of each image can yield convincing results.
In the video I also share the effect different exposure times have on a seascape photo. While short exposures of 1/15s and faster capture the explosive energy of the water, medium exposures of 1/4s - 2s create a sense of motion in the photo. Exposures of 10s or longer can transform the water into a sea of mist. It requires high enough waves and will not work well with a calm sea. The two photos I took at Fingal Head show a good comparison of how different exposure times can affect the look of a scene. The first one captures the drama and motion of the sea. The second one feels much more moody and mystic.
[imageBA]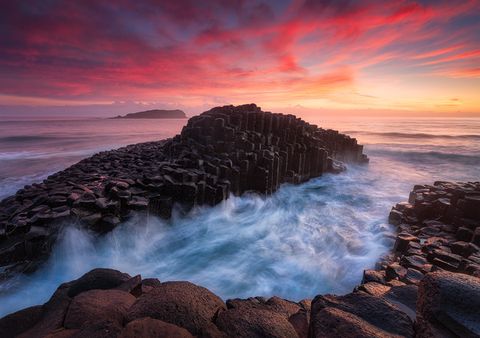
 [/imageBA]
Seascape Photography Workflow
You must know your equipment and be able to operate it without having to think about the technical aspects while in the field. Otherwise, it will distract you from the scenery you want to photograph. And when shooting at the water's edge, such distractions will not only lead to worse photos but sometimes also to damaged gear.
Preparation
Knowledge of your equipment comes from practice. The more photos you take, the more second nature dialing in the correct exposure or adjusting filters becomes. Besides that, you should inspect your equipment before heading out. When I plan seascape photography at sunrise, for example, I will examine my filters, charge my batteries, test my headlamp, check the camera settings, and pack my NYA-EVO Fjord 60-c the evening before.
I have another seascape photography routine when I arrive at the coast: I put on my headlamp, belt the Terrascape Pouch with my filters, place a lens cloths* and a cable release in my pockets, cover my backpack with a rain cover, and head out.
With a process like this, you don't have to rummage through your bag for accessories while you're at the coast. You take out the camera and afterward keep your backpack on your back or in a safe and dry place. The rain cover is for occasions when you have to take it off and place it on the wet sand or leave it further up on a beach to be more agile.

Photo Shoot
Then, during the shoot, you should know the right techniques for capturing seascapes. As with gear and settings, the key is again to have those techniques become second nature to your photography workflow at the coast.
I often start with a quick focus-stack and a bracketed exposure sequence for the background. Then, I focus on the action and take a photo for every incoming wave that looks promising. Using continuous shooting mode helps to capture the perfect moment for very dynamic scenes. If you use bracketing for seascape photography, set the sequence to 0, -, +. This way, you take the main exposure exactly when you want, and the exposures for highlights and shadows follow.
Also, vary the exposure times. As I mentioned above, different exposure times can change the mood of a seascape photo. Make experimenting with those second nature to your process in the field. You can later even blend images that were exposed differently to achieve a more artistic result. My usual workflow for changing exposure times is to first change the aperture - keeping it between f/8 and f/13, if possible. Then, I use my Kase ND8 or ND64 filter to expose even longer.
When I photograph seascapes before sunrise or after sunset, the exposure times will naturally be longer. It fits in well with the mood of dusk and dawn and creates a mystic look. But, if you want shorter exposure times, you can use higher ISO settings to achieve that. With modern cameras and AI noise reduction in Lightroom, going up to ISO800 is nothing to worry about.
Working with Tripods at the Coast
If you have ever taken photos on a beach with a tripod, you might have noticed it slowly sinking into the sand. It happens every time water rushes around it. Ideally, you find some rocks on which to position it. But if that's not possible, extend the lower portion of the legs to keep the locks clean and then push the tripod into the sand until there's no more movement. Often, half of the lower leg portion gets submerged in the sand until the tripod remains stable.
You must also be aware of rogue waves. You must be able to retrieve the tripod fast in case such larger waves rush up the shore. Be prepared for it.

Compositional Considerations
For a dynamic perspective, you should get down low with the camera. This way, the back-flow of water will draw the viewer into the image. But don't go too low. Avoid sacrificing the middle ground. If you have rocks in the foreground, you want to see the water flowing around them and not look against a wall. Show enough of the beach so a viewer of your photo can imagine walking along it.
Photo Editing Seascape Photos
Going through all the details of editing a seascape photo might go beyond the scope of this tutorial. But I want to at least give you some tips. In the video on timing above, I already covered some blending techniques you can use to combine different photos you've taken of the same scene. In the video, I show how masking in Photoshop can bring together the best parts of several images.
In the following video, I show you my exposure blending workflow in even more detail. If you used bracketing to capture the complete dynamic range of your seascape photo, you'll find the workflow I share in this video helpful. I show how to prepare different images in Lightroom by equalizing the exposures. It makes the blending much simpler, and you can combine it with advanced techniques like using Luminosity Masks.
Conclusion
From research to planning, from scouting to preparation, from taking photos at the coast to editing them in post, we have covered a lot of ground in this article. In the video tutorial below, I summarize the five key elements of my on-location seascape photography workflow once more:
- Scouting - It's essential to get the most out of a location. In addition to helping you find compositions, it also helps you to stay safe during a shoot.
- Tides - Both for safety and photographic reasons, knowing the tides is key. Use Tides4Fishing to get tide tables for the places you visit.
- Composition - Scouting does not only mean looking around for interesting subjects. Before every photo shoot, scout with the camera while leaving the tripod behind. Without a tripod, you're much more flexible in exploring different angles.
- Setup - Take your time to set up your equipment well away from the water. Make sure everything is in place, and ideally leave the backpack and all gear you don't need behind in an elevated position far from the water's edge.
- Photo Shoot - Seascape scenes are often very dynamic and require multiple exposures to capture all the details. So first of all, you must stabilize the tripod so it does not sink into the sand. Then start taking many photos while using - if required - focus stacking, exposure blending, different apertures, and ISO values. In post, you put everything together for the best result.
Even if your photographic routine in the field looks different than mine, it's good to have one. Just imagine, standing in the waves, taking photos of an awesome sunset, and then having a wave splash your filters. To then realize you left your filter cloth behind can be very annoying. A routine helps you avoid such surprises.